Biscoff Cookie Butter Brownies (No Eggs)
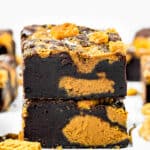
These Biscoff CookieButter Brownies (no eggs) are fudgy, decadent, and Biscoff-packed! This fun twist on traditional brownies is easy to make, delicious, and sure to steal the show.
Servings 12 brownies
Calories 433kcal
Ingredients
- 1 cup + 1 tablespoon (150 g) all-purpose flour
- 1 tablespoon (10 g) cornstarch
- 1/8 teaspoon (1 g) baking powder
- 1 teaspoon (4 g) kosher or sea salt
- 1/2 cup + 1 tablespoon (130 ml) milk
- 1 1/2 teaspoon (7.5 g) apple cider vinegar
- 3/4 cup (173 g - 1 1/2 sticks) unsalted butter
- 3/4 cup (150 g) brown sugar
- 3/4 cup (150 g) white granulated sugar
- 1/2 cup + 1 tablespoon (57 g) unsweetened cocoa powder
- 2 teaspoons (10 g) pure vanilla extract
- 1 teaspoon (3 g) instant espresso powder
- 1 1/4 cup (400 g - 1 Jar) LOTUS Biscuit Spread, divided (smooth or crunchy)
- 4 - 6 Biscoff cookies, roughly chopped (optional)
Instructions
- Preheat the oven to 325º F (165º C). Line an 8x8-inch baking pan with parchment paper. Lightly spray with baking spray.
- Combine flour, cornstarch, baking powder, and salt in a bowl. Set aside.
- In a mixing bowl or liquid measuring cup, combine the milk and vinegar. Let the mixture rest for 5 to 8 minutes, until thickened and curdled.
- Melt butter in the microwave. Alternately, you can do it over the stovetop in a medium saucepan.
- Stir in the sugars and mix until well combined, for about 2 - 3 minutes. The mixture must be homogeneous and glossy, not oily.
- Add milk mixture to the butter mixture; mix with a whisk to incorporate. Microwave the mixture for 2 minutes. Carefully remove the bowl from the microwave and continue mixing with the whisk for 1 – 2 minutes. Undissolved sugar will prevent you from getting the crackly top on the brownies, so rub a little of the mixture between your first finger and thumb to test. If it feels smooth with no grains of sugar, it's ready. If you can feel some grains, place the mixture in the microwave and heat for 1 more minute, and then mix with the whisk for 1 -2 minutes. Repeat until you don’t feel any grain of sugar at all.
- Add cocoa powder, and mix to incorporate; continue constantly stirring, for 2 more minutes. Add vanilla and instant espresso powder (if used), and mix to incorporate.
- Add the flour mixture; stir until mostly combined. Then add the chocolate chips and stir until no flour remains.
- Layer about half of the brownie batter mixture into the bottom of your prepared pan. Add generous dollops of the Biscoff spread all over. Using an offset spatula or a spoon, carefully cover the Biscoff spread chunks with the remaining brownie batter, making sure not to press them down too much.
- Warm slightly ¼ cup (about 80 g) of Biscoff spread in 10-second increments in the microwave. Spoon little cookie butter blobs over the brownie batter layer - it is okay if they are not perfect. Using a toothpick, the end of a knife, or a cake tester, drag it through the batter to give a swirled pattern. Add chopped Biscoff cookies on top, if desired.
- Bake for 40 – 50 minutes or until the brownies are set and the tops or cracked and shiny. You'll notice the center does not wiggle when the pan is moved. If in doubt, it's better to underbake these brownies rather than. Unfortunately, the toothpick test doesn't work well for these brownies because the chocolate chips get melty! IMPORTANT: Every oven is different, so baking times always have to be taken with a grain of salt. Oven thermostats can be wildly off, and that will all affect baking time.
- When the brownies are ready, remove them from the oven and set the pan on a wire rack until completely cooled.
- When completely cool, run a thin knife around the edge of the pan to make sure the block of brownies is loose, then lift from the pan using the parchment paper sling. Cut the brownies into 9 or 12 squares.
Notes
Store: Cover and store leftover brownies at room temperature for up to 7 days.
Freeze: Brownies freeze well for up to 3 months. Wrap cooled brownies in plastic wrap, then in foil, and then place them in an airtight freezer bag. Thaw overnight in the refrigerator, then bring to room temperature before serving.
Double the Recipe: If you double the recipe, use a 9 x 13-inch rectangular pan.
Recipe Tips:
- I suggest using a kitchen scale to measure the ingredients—it’s a game-changer! Trust me, using metric measurements gives you the most precise and easy-to-repeat results.
- Preheat the oven for at least 15 minutes before getting started to give it plenty of time to reach the ideal recipe temperature.
- Use high-quality chocolate chips. I like to use Ghirardelli Chocolate Premium Baking Chips 60% Cacao Bittersweet Chocolate or Callebaut Belgian Dark Couverture Chocolate Semisweet Callets, 54.5%.
- Make sure your sugar is fully dissolved to achieve that perfect crackly top on your brownies! Here’s a simple trick: after adding the milk and heating it in the microwave, rub a bit of the mixture between your fingers. You’re good to go if it feels smooth without any sugar grains! But if you still feel some grains, pop it back in the microwave for another minute, then give it a good whisk for 1 to 2 minutes. Keep repeating until you don’t feel any sugar grains at all. Easy peasy!
- Biscoff Swirls: Warm up the Biscoff spread before adding the drop dollops of Biscoff spread on top of the batter to make the swirls; just a quick zap in the microwave will do the trick. You want it to be warm enough to loosen up a bit but not too hot to become runny. A little warmth goes a long way in creating swirls that are as beautiful as they are delicious.
- Add extra Biscoff cokies!If you’re a die-hard Biscoff fan, add extra crushed cookies to the batter for even more cookie goodness.
- Bake the batter as soon as it is ready.
- Don’t open the oven door until your baked goods have set. Leave the oven closed until the minimum time is stated in the recipe.
- Every oven is different, so baking times should always be taken with a grain of salt. Oven thermostats can be wildly off, affecting baking time, so keep an eye on yours.
- Gluten-Free: Use a gluten-free, all-purpose flour blend. Look for a gluten-free flour blend specifically formulated for baking, as it will have the right combination of flours and starches to mimic the texture of wheat flour. My favorite is Better Batter Original Blend.
- Dairy-Free: To make this recipe dairy-free, you can easily swap out the dairy ingredients for non-dairy alternatives. Instead of milk, use non-dairy milk like almond, soy, or oat milk. And use vegan butter instead of dairy butter. There are many brands available in stores. I usually use Earth Balance Vegan Buttery Sticks.
Nutrition
Calories: 433kcal | Carbohydrates: 55g | Protein: 4g | Fat: 23g | Saturated Fat: 10g | Polyunsaturated Fat: 1g | Monounsaturated Fat: 3g | Trans Fat: 0.5g | Cholesterol: 32mg | Sodium: 243mg | Potassium: 117mg | Fiber: 2g | Sugar: 36g | Vitamin A: 376IU | Calcium: 41mg | Iron: 1mg