
This is a no-fuss, homemade honey oatmeal bread that can be made with instant yeast or sourdough starter. It’s easy to make with simple ingredients and will rise above most (if not all) store-bought bread loaves.
Homemade Easy Honey Oatmeal Bread Recipe Highlights
Few people can resist the tantalizing aromas of freshly baked bread wafting through the house, spilling out onto the streets, and resulting in your neighbors drooling.
Have some fun in the kitchen making homemade oatmeal bread, which is simply irresistible. Whether you slice it up for breakfast, lunch, dinner, or a quick midnight snack, you’ll never want to munch on store-bought bread again after you’ve tasted this mouthwatering version.
Easy to make with simple ingredients, this soft and delicious bread will make the whole family happy! Add-ins are welcome, add any combination of nuts, seeds, dried fruit, and herbs to handcraft this recipe into your very own.
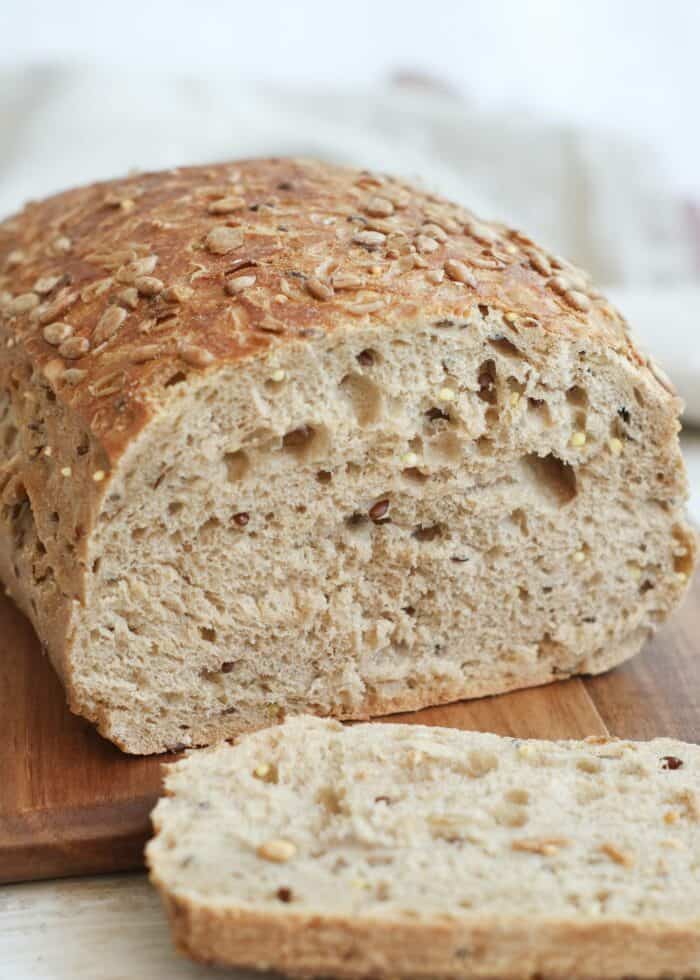
The melding of creamy oats, nutty whole wheat flour, and soft bread flour is what makes this loaf of bread irresistible. Oatmeal bread freezes incredibly well; you can double this recipe, having a loaf of bread on standby at all times.
Honey Oatmeal Bread Ingredients You’ll Need & Notes
Please check the recipe card at the bottom of the post for exact quantities and detailed instructions (scroll down).
- Quick oats: Thin quick oats are best used in this recipe as rolled oats are thicker and need more water to soak them up. If you only have rolled oats, blend and break them up a little in a blender or food processor so they’ll cook more evenly.
- Whole wheat flour: whole-wheat flour is less processed, and higher in fiber with an earthy flavor and denser texture. Whole wheat flour can be substituted with bread, or all-purpose flour is needed.
- Boiling water: This is needed to cook and hydrate the oats giving the bread a nice spongy texture after baking.
- Whole milk: The fats and lactose in milk soften the crumb of the bread as well as makes the bread sweeter. Skim, 2% milk, or any plant-based milk can be substituted without significantly affecting the bread results.
- Yeast: Yeast gives the bread a distinctive tangy and sour flavor. Regular instant yeast can be substituted for sourdough starter. 2 teaspoons (6 g) of yeast = 6 tablespoons (100 g) of sourdough starter.
- Sea salt: Sea salt or kosher salt is a better quality of salt to use instead of table salt; if you only have table salt, this can be substituted using half the amount.
- Honey: Honey not only adds sweetness, but it also helps the yeast grow and ferment as well as adds moisture to the bread.
- Vegetable oil: Fats work to soften breads preventing them from being tough and dry. Substitute vegetable oil for canola, sunflower, grapeseed, or any other flavorless oils. Light olive oil can be used; however, it’s not recommended to use extra-virgin olive oil as the flavor may be overpowering.
- Bread flour: Bread flour contains high amounts of protein, which helps to give the dough a nice stretchy feel and chewy texture when cooked. All-purpose flour can be used; however, the end result won’t be as chewy and light as it would be using bread flour.
- Olive oil cooking spray: This is used to grease the pan, although any cooking spray will do the trick.
Add-ins Ideas
You may want to add-in in some additional items to your bread, such as nuts, seeds, dried fruit, and herbs. These items can be added to the bread in step 2: Making the dough.
Here’s a list of suggested items and amounts that could be mixed into your bread:
- Chopped or Sliced Nuts: ½ cup (72 g) of any varieties of nuts you prefer, such as almonds, walnuts, cashews, or pecans.
- Seeds: ¼ cup (33 g) of either sunflower, pumpkin, hemp seeds, sesame seeds, or flax seeds
- Dried Fruit: ½ cup (95 g) cranberries, raisins, blueberries, apples, pears, apricots, dates, figs, or pineapple. Any large pieces of fruit, such as apricots, need to be chopped.
- Dried Herbs: 2 teaspoons (4g) of dried herbs such as rosemary, parsley, thyme, sage, or chives.
Pro Tip: Just note that some fruit, such as dried blueberries, will stain and color the dough.
Overview: How to Make Honey Oatmeal Bread Step-by-Step
- Make the oatmeal
In the bowl of a stand mixer or a large mixing bowl, combine the oats, whole wheat flour, and boiling water with a wooden spoon. Allow the mixture to cool until it is just barely warm, about 20 to 25 minutes.
- Make the Dough
Add the milk, yeast, salt, honey, vegetable oil, and bread flour into the bowl with the oatmeal.
Mix on low speed with the dough hook attachment or by hand with a wooden spoon, until all the ingredients are incorporated, and it forms a shaggy dough. There shouldn’t be any dry spots of flour, but the surface will still be rough. - Kneading the dough
Continue to mix on low speed for 5 minutes, kneading the dough for 5 minutes. It will be very sticky at the beginning, but try not to add more flour, as it will make the loaf dry. After kneading, the dough should be elastic and somewhat smooth, but still very soft.
If mixing by hand, turn the dough out onto a floured work surface and knead by hand for 10 minutes. Use the palm of your hand to push the dough down and away from you, stretching the dough. Then, fold the dough in half toward you, rotate the dough, press, and extend the dough again. Continue pressing, stretching, and rotating to knead the dough until smooth but still soft.
Pro Tip: Use the windowpane test to tell if you’ve properly kneaded the bread dough. A properly kneaded dough should be able to stretch, without tearing and have a thin membrane that you can see through. It means that the dough is ready to rise and the gluten is well-developed. - The first rise
Form the dough into a ball and place it in a clean, lightly floured bowl. Cover with plastic wrap or a clean tea towel and let it rise in a warm spot until roughly doubled in size, about 1 1/2 hours.
- Prepare the pan
Lightly grease a standard loaf pan 9×5 inch (23x13x8cm) with olive oil cooking spray.
- Forming the loaf
Remove the dough from the bowl, placing it on a floured work surface. Use your hands to gently stretch the dough into a roughly rectangular shape. Starting lengthwise, pull one side of the dough, folding it into the middle, followed by folding the other side of the dough into the middle, overlapping the original fold. Roll the dough so that the seam is now facing down. Pinch the ends of the dough before tucking them underneath the dough.
Pro Tip: Don’t be too worried about what the dough looks like once it’s in the pan. As it rises, the dough will expand and fill the pan. Be patient and wait for it to double in size, and you’ll have success. - Second Rise
Lift and set the dough into the loaf pan, cover it with a damp kitchen towel, and let it rise in a warm area for 1-1/2 hours until it has doubled in size.
- Bread Baking Time
Adjust the oven racks, having one directly in the center of the oven and another rack at the very bottom. Preheat the oven to 400℉ (200℃). Fill a small pan with water, adding it to the bottom rack while the oven is heating up. Bake for 40 minutes until the bread reaches 200℉ (102℃) using a digital thermometer or has a hollow sound when tapping the center of the loaf of bread.
- Cool the loaves and slice
Remove the bread from the oven and place it on a heat-proof surface in the kitchen. Let the bread cool for 15 minutes in the loaf pan. Set up a wire cooling rack on the kitchen counter and turn the loaf pan upside down to release the bread from the pan. Turn the bread over, so the top side is facing upward, and let the oatmeal bread cool for at least 30 minutes before slicing.
Recipe Tips
Use a piece of tape or an erasable marker to make a note of where your dough started to tell when it has doubled in size easily.
It’s best practice to use an instant-read kitchen thermometer to check the room and water temperatures when baking bread.
For extra moist and crusty bread, add an oven-safe cup or pan filled with water inside of your oven; the water will create steam during the baking process helping the bread to stay moist and crusty.
When forming the bread loaf, do it as gently as possible not to let all the air escape.
When baking the bread, if the top starts to become too dark, loosely cover the pan in foil to prevent the top from burning without steaming the bread.
Cutting off a warm slice of fresh bread out of the oven is tempting, but letting the bread rest is an important step to prevent the bread from being too wet or soggy in the center as it continues to cook even after it’s removed from the oven, just like a steak.
Frequently Asked Questions
To be 100% precise, it is better to weigh out all your ingredients using a kitchen scale; after all, baking is a science. If you happen not to be stocked with a scale, using dry and wet measurements will still do the trick.
Yes, you can make this recipe using a sourdough starter. In that case, substitute 2 teaspoons (6 g) of instant yeast with 100 g of sourdough starter. Then, the flour and water need to be decreased by 50 g each. Meaning, you will use 250 g of bread flour and 190 ml of boiling water. Take into consideration that bread made with sourdough starter need more time to rise, almost double the time.
Substitute 2 teaspoons (2 g) of instant yeast with 6 tablespoons (100 g) of sourdough starter. The directions for the bread can then be followed by substituting the yeast with the starter for this step.
Yes, absolutely, it makes sense to do the same amount of work in order to gain double the rewards.
Storing & Freezing Instructions
Store
Store your bread at room temperature in a sealed plastic bag for up to 6 days.
Freeze
After the bread is cooled off completely, place the loaf or ½ loaf of bread into a sealable freezer bag. It will last in the freezer for up to 3 months.
Thaw
Thaw the bread overnight at room temperature.
More Bread Recipes You’ll Love!
- Best Eggless Banana Bread
- Homemade Flatbread
- Eggless Cranberry Orange Bread
- Homemade Eggless Monkey Bread
- Easy Eggless Zucchini Bread
- Eggless Honey Whole Wheat Rolls
- Eggless Homemade Hawaiian Rolls
- Soft & Easy Eggless Dinner Rolls
- Browse more recipes…
❤️ Love what you see? JOIN my Private Baking Club. Also, SUBSCRIBE to Mommy’s Home Cooking, so you’ll never miss a recipe! And FOLLOW along on Instagram, Pinterest, and Facebook for more fun!
Recipe Card 📖

Homemade Easy Honey Oatmeal Bread
Equipment
Ingredients
- 1 cup (89 g) quick oats
- ½ cup (60 g) whole wheat flour
- 1 cup (240 ml) boiling water
- ⅓ cup (80 ml) lukewarm milk
- 2 teaspoons (6 g) instant yeast (see notes for sourdough starter)
- 1 teaspoon (4 g) kosher or sea salt
- 3 tablespoons (63 g) honey
- 3 tablespoons (45 ml) vegetable oil
- 2 1/2 cups (300 g) bread flour, plus more for dusting
- Olive oil cooking spray, for greasing
- 1 – 2 tablespoons old fashioned regular rolled oats, for topping (optional)
Instructions
Make the oatmeal mixture:
- In the bowl of a stand mixer or a large mixing bowl,combine the oats, whole wheat flour, and boiling water with a wooden spoon. Allow the mixture to cool until it is just barely warm, 20 to 25 minutes.
Make the dough:
- Add the milk, yeast, salt, honey, vegetable oil, and bread flour into the bowl with the oatmeal mixture. Mix on low speed with the dough hook attachment, or by hand with a wooden spoon until all the ingredients are incorporated, forming a shaggy dough. There shouldn’t be any dry spots of flour, but the surface will still be rough, about 3 minutes.
Knead the dough:
- Continue to mix on low speed for 5 minutes, kneading the dough for 5 minutes. It will be very sticky initially, but try not to add more flour, as it will dry the loaf. After kneading, the dough should be elastic and somewhat smooth but soft.Pro Tip: If mixing by hand, turn the dough out onto a floured work surface and knead by hand for 10 minutes. Use the palm of your hand to push the dough down and away from you, stretching the dough. Then, fold the dough in half toward you, rotate the dough, press, and extend the dough again. Continue pressing, stretching, and rotating to knead the dough until smooth but still soft.
The first rise:
- Form the dough into a ball and place it in a clean,lightly floured bowl. Cover with plastic wrap or a clean tea towel and let itrise in a warm spot until roughly doubled in size, about 1 1/2 hours.
Prepare the pan:
- Lightly grease a standard loaf pan 9×5 inch(23x13x8cm) with olive oil cooking spray.
Form the loaf:
- Remove the dough from the bowl, placing it on a floured work surface. Use your hands to stretch the dough into a roughly rectangular shape gently. Starting lengthwise, pull one side of the dough, folding it into the middle, then folding the other side into the middle, overlapping the original fold. Roll the dough, so it now has the seam facing down. Pinch the ends of the dough before tucking them underneath the dough.
Second Rise:
- Lift and set the dough into the loaf pan, cover it with a damp kitchen towel, and let it rise in a warm area for 1-1/2 hours until it has doubled in size.
Bread Baking Time:
- Adjust the oven racks, having one directly in the center of the oven and another rack at the very bottom. Preheat the oven to400℉ (200℃). Fill a small pan with water, adding it to the bottom rack while the oven is heating up.
- Optional – To add the topping: Uncover the risen loaf. Brush with heavy cream all over the top crust, then sprinkle with the rolled oats.
- When the oven reaches the desired temperature, bake the loaf for 40 minutes until the bread reaches 200℉ (102℃) using a digital thermometer or has a hollow sound when tapping the center of the loaf of bread.
Cool the loaf and slice:
- Remove the bread from the oven and place it on a heatproof surface in the kitchen. Let the bread cool for 15 minutes in the loafpan. Set up a wire cooling rack on the kitchen counter, turn the loaf panupside down to release the bread from the pan. Turn the bread over so the topside is facing upward, and let the oatmeal with sourdough bread cool for atleast 30 minutes before slicing.
- It’s best practice to use an instant-read kitchen thermometer to check the doneness when baking bread. In this case, it should read 200℉ (102℃).
- For extra moist and crusty bread, add an oven-safe cup or pan filled with water inside of your oven; the water will create steam during the baking process helping the bread to stay moist and crusty.
- When forming the bread loaf, do it as gently as possible not to let all the air escape.
- When baking the bread, if the top starts to become too dark, lightly wrap it in foil to prevent the top from burning without steaming the bread.
- Even though cutting that warm slice of bread fresh out of the oven is tempting, letting the bread rest is an important step to prevent the bread from being too wet or gummy in the center as it continues to cook even after it’s removed from the oven, just like a steak.
Leave a Reply